Building a Survival Shelter

Building a survival shelter can be an important step towards saving your life in an emergency wilderness situation. Exposure is the most common cause of death in wilderness survival situations, and shelter is one of the primary tools used to mitigate that threat. After fire, the ability to create shelter is probably the most important skill to understand to ride out inclement conditions.
Ideally, you will practice building a survival shelter before the need ever arises. To make truly comfortable shelter, many hours of practice is necessary. However, you need not dedicate all your free time to building survival shelters in preparation for an unlikely emergency; with some pertinent direction you can make a shelter that will get you through the night the first time you try!
The first thing to consider is what a shelter is actually used for. A survival shelter is primarily used for preventing exposure. It will either help you stave off the cold, or take refuge from the heat. It need not be a home. Building a survival shelter can certainly provide a sense of place in boundless wild and act as a ward against panic, but these are tangential benefits. Preventing exposure is its primary utility.
Our concern is keeping our body temperature stable, so depending on where you are in the world, exposure can take the form of either an excess or deficit of heat. If you are building a survival shelter in the desert southwest in July, you may very well be trying to create shade and cool off. In the Pacific Northwest, however, we will typically be attempting to stay warm in cold conditions, and this article will reflect that.
Because we are building a survival shelter to stay warm, it is good to start with an understanding how we get cold. There are four primary forms of heat loss that we will contend with in a survival situation. These are: conduction, convection, radiation, and evaporation. Conduction is heat lost as your body warms any surface it is in contact with, convection is heat lost as your body heats air or water flowing around it, radiation is heat lost to space, and evaporation is heat lost as water evaporates off your body, such as in sweating. The important thing to remember is that your body will warm anything colder than you that it comes in contact with, be that the ground or the wind, and if that that process isn’t halted you will get cold.
Our goal in building a survival shelter is to halt these processes, and our method of doing so will define our construction technique. Survival shelters can be broadly divided into two categories: insulated and heated. Insulated shelters strive to trap your body heat within them and heated shelters utilize the warmth of a fire in some way. Which of these two strategies you employ will be situationally dependent.
Insulated Shelters
Insulated shelters are simple and straightforward to build. The idea is basically to create a sleeping bag out of natural materials. Large amounts of debris or other materials are used as insulation to trap your body heat the same way down would, by creating pockets of still air which can be warmed to your body temperature.
Once the materials you are in contact with are heated to the temperature of your body, the cooling process will stop, so long as that heat can remain trapped. The problem with insulated shelters is often the quantity of material required to trap heat. Without sufficient insulation, these shelters are useless.

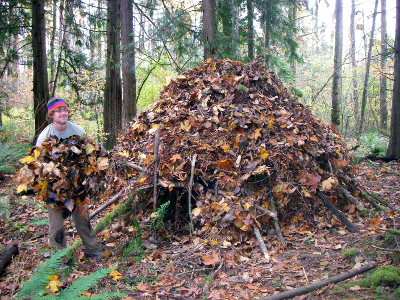
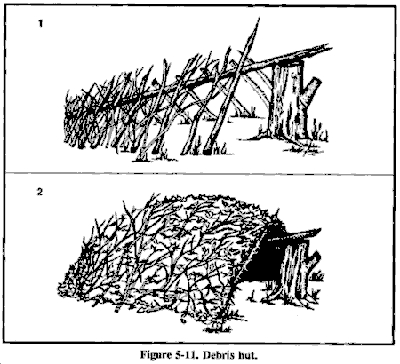
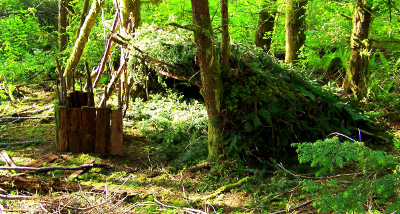
The debris hut is the classic example of an insulated shelter. Essentially, you create a small framework which can be piled high with whatever kind of debris you have available. Moss, ferns, grasses, leaves, and pine needles will all work. The inside of the shelter is also packed with debris, and the entrance is sealed to prevent convective heat loss.
Generally speaking there should be at least three or four feet of debris piled on top of the shelter, and the inside of the shelter should be so packed that you can barely fit, with at least eight to twelve inches of debris between yourself and the ground.
Be More Prepared For Your Next Outdoor Adventure!

Don't leave home without knowing these six essential survival skills. Our free survival mini guide reveals the strategies of:
- Shelter & fire to prevent the number one cause of death
- Obtaining clean water to avoid life-threatening dehydration
- Common wild survival foods and other critical skills!

Heated Shelters
Heated shelters are often quicker to build than insulated shelters, and require less materials, but also rely on a healthy fire to keep you warm. These shelters are always at least partially open to the elements and very susceptible to heat loss, so the fire must be maintained through the night for the shelter to have any efficacy. In this case the shelter itself is not intended to keep you warm. It provides some protection from the weather and increases the efficiency of the fire.
Although these shelters often require less materials themselves, you must also plan to harvest sufficient firewood, without which you will be almost as cold as if you were to just sleep out. Generally, problems with heated shelters relate back to inefficiencies with the fire, either having too little wood, or too small a fire.
The benefit of heated shelters is that fire is immediately warming, and can actually reverse hypothermia rather than just preventing it prior to onset, and the fire can always be made bigger if need be.

The lean-to is the classic heated shelter. Roof poles are leaned up at a 45-degree angle along a ridge pole placed about head height, and covered in shingling or thatching material to create a dry place to make a bed, which can consist of insulative material such as boughs. A large body length fire is kindled about a step length away from the front of the shelter and maintained throughout the night. The roofing poles pull double duty, keeping you dry, while also absorbing and re-radiating the heat of the fire. The shelter must be angled more steeply and more thoroughly thatched in rainy conditions to keep you dry.
Regardless of the type of shelter you decide to build, be sure to consider hazards. Look out for potential dangers, such as loose rocks or compromised trees. Consider where wildlife may be. Where will cold or water pool? Is there drinking water nearby? And, where will you source your building materials and firewood?
In most situations, I tend to prefer heated shelters. The security and warmth provided by a fire, as well as the expedient nature of their construction outweighs any inconvenience of gathering firewood in my opinion. Insulated shelters will more often be utilized in pleasant conditions, places where materials such a pine needles or grass are found in abundance, or in the unfortunate case of not being able to build or maintain a fire.
Pragmatism aside, building a survival shelter can be an engaging exercise, and make for a fun day in the outdoors. With some practice you can become quite adept at creating a refuge for yourself in inclement conditions, and the practice could save your life in an emergency!
By the way, if you enjoyed this article then you'll love our survival mini guide. You'll discover six key strategies to staying alive in the outdoors plus often-overlooked survival tips. We're currently giving away free copies here.
Related Resources on Building a Survival Shelter
Debris Hut Construction Article
Basics of Wilderness Survival Shelters Article
Building a Survival Shelter - Debris Hut Video
Related Courses:
Wilderness Survival Courses at Alderleaf

About the Author: Jedidiah Forsyth is an experienced outdoor educator and wildlife tracker. He is a guest instructor at Alderleaf Wilderness College. Learn more about Jedidiah Forsyth.
Return from Building a Survival Shelter back to Survival Articles
Is The Essential Wilderness Survival Skills Course Right for You? Take the "Online Survival Training Readiness" Quiz
See for yourself if this eye-opening course is a good fit for you. It takes just a few minutes! Get your Survival Training Readiness Score Now!

Grow Your Outdoor Skills! Get monthly updates on new wilderness skills, upcoming courses, and special opportunities. Join the free Alderleaf eNews and as a welcome gift you'll get a copy of our Mini Survival Guide.

 The Six Keys to Survival: Get a free copy of our survival mini-guide and monthly tips!
Learn more