Flint Knapping Arrowheads
Beyond the Basics with Step-by-Step How-To Photos
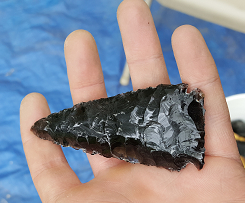
Flint Knapping Arrowheads by Russell Field
As one of the oldest technologies, flint knapping arrowheads changed the way our ancestors moved through the ancient world. The manipulation of certain stones made hunting easier and more effective. With this small advancement we launched ourselves to the top of the food chain.
So, what is flint knapping? It’s a simple concept. A stone with high silica content, in this case obsidian, is chipped until the desired shape, thickness, and sharpness are obtained.
(Note: Feel free to check out our basic flint knapping article before proceeding to the intermediate information below).
There are many variables to consider when flint knapping arrowheads or knives. So, before we get too far, lets first lay out some terms and concepts about flint knapping arrowheads.
In the big picture, we make tools by chipping away at a piece of stone. There are a few methods we use to accomplish this.
The first is called percussion flaking. This is the best technique when removing large to medium flakes. This is a dynamic process. We take a hammer stone or bopper and raise it above the piece and strike a platform (defined in the terminology section below).
The tools I use for percussion are sandstone hammer stones. These hammer stones work well with very brittle material like obsidian. I also will use two different types of boppers or billets. One is an antler from an elk. The other is called a copper bopper. It is a copper cap filled with lead attached to a wooden handle. I use boppers when I think I might break the piece with a stone or I need very controlled flake removal.
The second method is called pressure flaking. An antler tip, piece of copper rod, or copper nail fitted into a handle is used to remove small flakes for shaping and finishing. This technique is more static. The tip of the antler or copper rod is placed on the platform and pressure is applied and then a small flake is popped off. It helps me to think of the removal of flakes like I was peeling them off of the material.
My favorite tool for pressure flaking is a piece of copper wire, 4 to 6 gauge, jammed into a piece of wood for the handle. Using the tip of a deer antler can also work well.
Terminology for Flint Knapping Arrowheads
Conchoidal Fracture: The predictable fashion in which workable stone fractures. So named for the clamshell-like appearance of the resulting flakes.
Platform: The point on the stone to which force is applied for the purpose of removing material. This is where you hit the stone to detach the flake.
Unifacial: Means a stone has been flaked on one face. Scrapers or adzes are often times unifacial.
Bifacial: Refers to a stone having been worked on two faces. Biface is a term typically applied to thin unfinished cores or preforms that have been flaked on both faces.
Anatomy of a Stone Flake:
- Proximal refers to the near, or platform, end of the flake; the end to which force was applied to detach the flake from the stone.
- Distal refers to the far end of the flake, opposite the platform, which detached from the stone last.
- Ventral refers to the belly or freshly exposed interior surface of a flake; this face would have been within the stone prior the flake being detached.
- Dorsal refers to the back or exterior surface of a flake; would have been the outside surface of the stone prior to the flake being detached.
- A Flake Scar is the impression left on a stone after the removal of a flake.
- Bulb of Force refers to a convex or bulb-like area near the platform on the ventral surface of a flake resulting from the force exerted to detach the flake; also known as the Bulb of Percussion.
Concepts for Flint Knapping Arrowheads
Hertzian Cone:
The first concept to understand in flint knapping arrowheads is something called the Hertzian Cone. When one object strikes another object, the force does not travel in a straight line. It fans out, creating a cone. When flint knapping, we are creating a partial cone. This is important for when you are choosing the angles of your platforms and the angle of your swing/strike.
If you have ever seen a small rock or a bb hit a pane of glass, if the glass doesn’t shatter, you can see a point of impact on one side of the glass, and then there is a complete circle around the impact point. That circle is the Hertzian Cone. The top of the cone is where the strike point was. The force from the impact radiates out from one side to another.
Imagine that your hammer stone or bopper is the bb and the obsidian is the pane of glass. If we are strategic with where we strike the material, we isolate a part of the Hertzian Cone to take nice flakes off in a controlled manner.
Centerline:
The next concept for flint knapping arrowheads is that there is an imaginary centerline that is always present and very important to being efficient with the removal of material. To effectively take reliable flakes off, you need to understand that there is always an imaginary centerline in any piece you are removing flakes from. This centerline dictates whether or not you should hit a platform.
Let’s say that our platform looks perfect. The angle is good, and it’s not too sharp or too dull. We hit it and nothing happens, or we break our piece, or get what's called a step or hinge. One thing that we may have overlooked is that our platform was above the centerline of the stone. When this happens the force comes in contact with too much mass and breakage can occur.
Steps for Flint Knapping Arrowheads
Parent Material:
The first step to creating anything out of a rock is to obtain the raw unworked piece of stone, known as parent material, a cobble, or a core. For this article we are using obsidian that was dug out of the earth. Once you have your material you are then ready to start working. The more organized with your removal of flakes, the nicer the piece will turn out. I think of flint knapping arrowheads like putting together a 3D glass puzzle, backwards, using a croquet mallet.
Striking Platforms to Make Workable Flakes:
Now that you have your parent material, how do you make anything from it? The simple answer is you hit it. But where and how hard you hit it depends on what your hammer is made from, and how hard the stone is.
You always want to hit a stone like obsidian on a platform. Remember from the terminology above, a platform is a point on the core to which force is applied for the purpose of removing material. This is where you hit the core to detach the flake. Good platform selection and preparation is one of the keys to efficient and skillful production of stone tools.
Platforms are best evaluated in terms of degrees. On a 90 degree edge there is not a platform and there is nothing for the hammer to grab on to peel a flake off. The best angle for proper flake removal is 60 to 70 degrees. The stoutness of the platform is another important aspect of proper platform preparation. A platform edge that is too sharp will just crumble and crush. A platform with a rounded edge can be very hard to get any flakes from. Hammers and pressure tools glance or slide right off.
It is also important to size the hammering tool to the size of the piece that you are working. To remove big flakes, you need big tools. For the first flakes off a cobble a big hammer stone within reason is best. And as we work the piece down, it gets smaller and so should our tools.
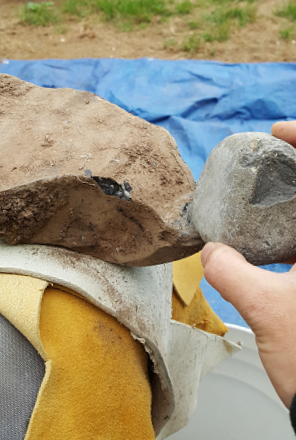 Striking a platform below centerline to create a flake
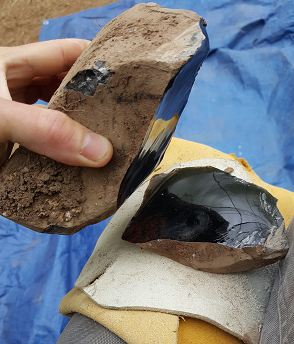 Flake successfully struck from the core (parent material)
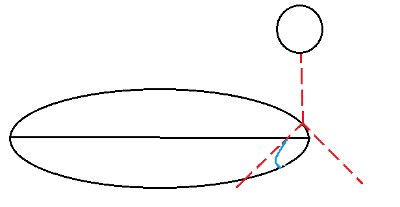 Don't strike a platform when it is above the imaginary centerline, as in the diagram above
In the diagram above the strike was above the centerline and the Hertzian cone is represented by the red dotted line. You might expect the force to travel along the red line and pop off the piece of stone under that line. But there is too much mass in the way. So in reality, the wave of force traveled on the red line for a moment then found the path of least resistance. This is indicated by the blue line. This results in what we call a hinge fracture. Needless to say, a hinge is not what we want and can make the process take much longer.
When striking a cobble of obsidian, the right amount of force results in the best flakes. It would be pretty much impossible for me to describe how much force is actually needed. When I teach this particular skill, I often have to tell people to hit harder. But hitting it as hard as you can is also unproductive. When the impact is too hard the stone will often crumble and shatter.
Edging a Flake:
Now that you have a nice flake, we can move on to the second stage of the reduction process which is called edging. What this means is basically to remove any rounded or squared-off parts of the flake, so that it eventually has sharp edges all the way around the flake.
There is a specific way in which we go about this. There are a few names for this part of the process. Some call it alternate flaking, upstairs downstairs flaking, or zipper flaking. All these terms mean the same thing.
I use this technique when I have edges that are square (90 degrees) or rounded. I start to remove flakes on the corners where the squared edges turn into a less aggressive angle.
Take your hammer stone and hit that corner (but make sure you've first abraded the edge and the platform is below centerline). The flake should travel on the ridge and take more of the square edge off.
After a flake is removed, flip the piece over and take another flake off the opposite face. Repeat this until the square edge is gone.
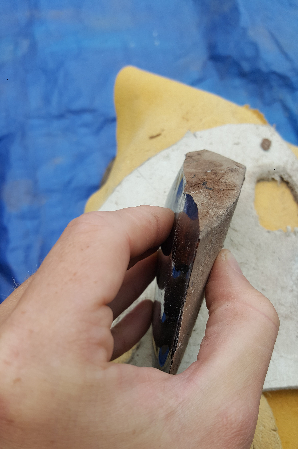 Looking at a squared off edge that needs to be addressed
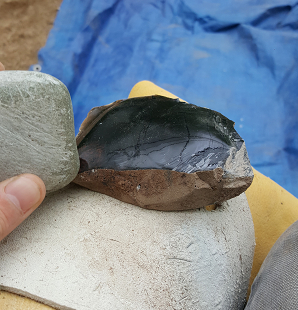 Striking the corner to begin the edging (alternate flaking) process to remove the squared off edge
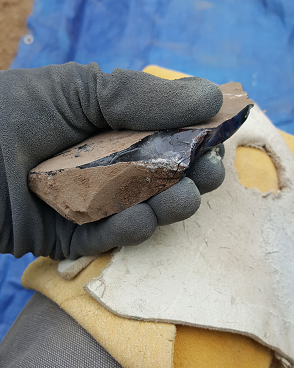 Flipping over the piece to remove a flake from the opposite side
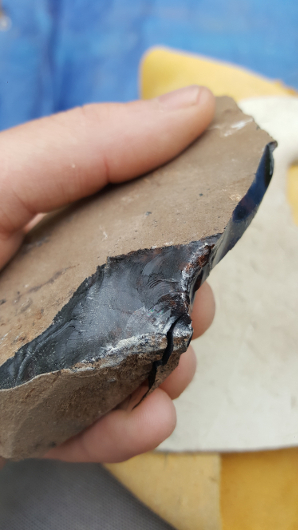 Second edging flake removed
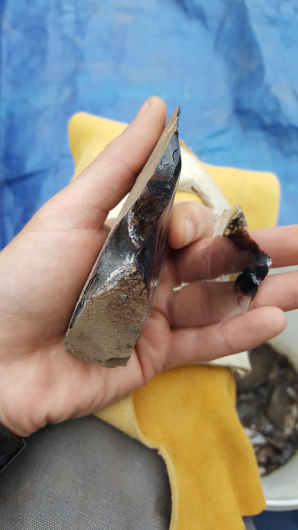 More edging flakes removed to get rid of the squared edge
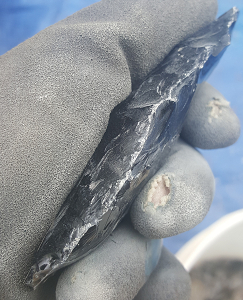 Edging completed. Now there is a sharp edge around the entire flake (biface). The squared off edges have been removed.
Primary Thinning:
The next step in the reduction process of flint knapping arrowheads is called primary thinning. Once you have taken out all of the unusable platforms (squared edges) around the edge of your piece, it’s time to look for big humps and ridges on the faces of your stone. You eliminate them by hitting platforms that line up with these humps and ridges using the same percussion technique as described above.
The goal is for the flakes removed during primary thinning to be big flakes. They can extend the width of the biface. The whole purpose is to thin the biface out, hence the name. If your arrowhead or knife is too thick it can make hafting impossible.
Be More Prepared For Your Next Outdoor Adventure!

Don't leave without knowing these six essential survival skills. Our free survival mini guide reveals the strategies of:
- Shelter & fire to prevent the number one cause of death
- Obtaining clean water to avoid life-threatening dehydration
- Common wild survival foods and other critical skills!

The other things you should start paying attention to at this stage is the shape and centerline. Often the shape will dictate itself (at least for me). If I have an idea in my head about the general shape, it tends to come out that way even if it’s very rough.
When I demonstrate the shaping process the first shape I go for is a round or an oval biface. Then I slowly take flakes off during the thinning stages and decide where my tip and base will be. Sometimes it is determined by how thick each end is. I like to make the thicker end my base and the thin end the tip. It feels right to me although if you do the opposite the hafting process (attaching to an arrow shaft) is much easier because you are hafting the skinny end.
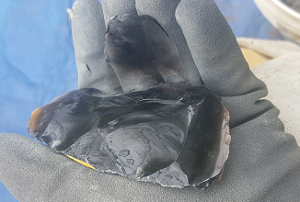 Thinning flake removed from the biface
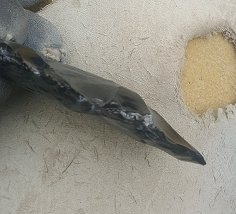 The biface is becoming thinner, as intended.
Secondary Thinning:
The next step in flint knapping arrowheads is secondary thinning. The main difference between the two thinning stages is that there is more shaping involved in the second stage. During this stage, you want the flakes to go from the edge to the center of the face, rather than across the entire width of the piece. This is controlled by adjusting the angle of the Hertzian cone by holding the biface at more of an angle (see diagrams below).
Also, this is the stage where the flakes you remove help make both faces convex. It is important for flake removal and structural stability that both the ventral and dorsal sides are convex.
Finishing Stage:
After secondary thinning, the fifth stage of flint knapping arrowheads is the finishing stage. I will use a hammer stone to get as close to my final shape as I can. In the stages above we talk about using percussion to get big flakes. In some cases, much smaller flakes are needed. To achieve smaller flakes, a slightly different angle at the contact point is required. If you angle the biface edge upward the flakes can be very long but the platforms need to be just right. For short flakes the biface edge is more pointed towards the ground and platforms are less important.
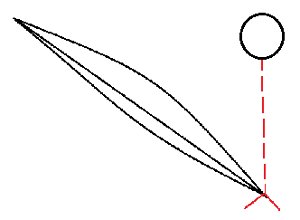 Angling the biface down so that the flakes removed are short
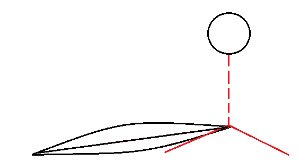 Angling the biface up slightly, so that the flakes removed are longer
Pressure Flaking:
Once you are happy with the shape using percussion, we move on to pressure flaking. First if any more shaping needs to happen you can shape using pressure, again by taking short flakes off the edges. The shaping that needs to happen at this stage should be minimal because the flakes removed by pressure flaking are usually pretty small.
After the shape is done we want to straighten and sharpen the edges. We accomplish this with pressure flaking. The pressure tool is held in the dominant hand and the biface in the non-dominant hand. The tip of the flaker is then placed on the prepared platform. I use my legs to help me apply more pressure by putting the back sides of my hands against the inside of my knees, so that when I squeeze my knees together lots of pressure builds up with the pressure flaker. The pressure that is needed to peel flakes off can be quite a lot.
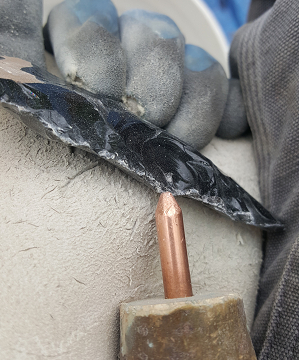 Pressure flaking the edge to straighten the edge and to make it sharper
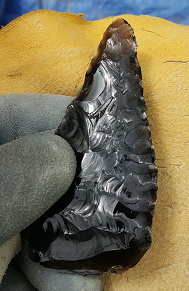 Pressure flaking almost completed
Notching:
The last step in flint knapping arrowheads is notching. Notching is a type of pressure flaking where you are strategically taking off flakes at the base of the arrowhead on either side of the base to create divots used in the hafting process. The tools that are used for this are very similar to the pressure flaker but instead of a blunt point the tips are flattened to a chisel shape to make a much narrower entry point.
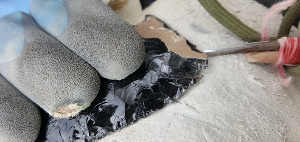 Notching the arrowhead
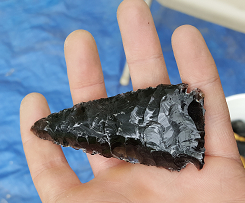 Notching completed! The arrowhead is done.
My Favorite Tools for Flint Knapping Arrowheads
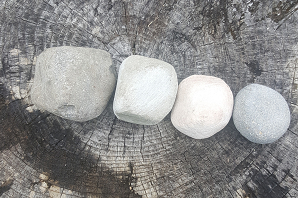 Sandstone Hammer Stones: I have different sizes so I can match the weight of the hammer stone to the size of the biface that I am working.
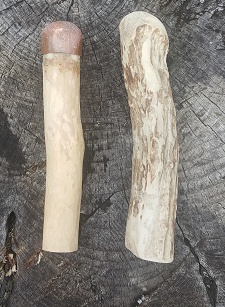 Billets (antler and copper billets, also known as boppers). I like to use copper more than antler. Copper is a little more forgiving.
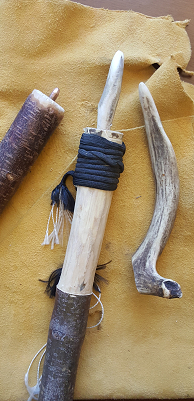 Pressure flakers (antler tips and copper rod or nail). I use mostly my copper pressure flakers. Platform prep is a little more difficult with antler.
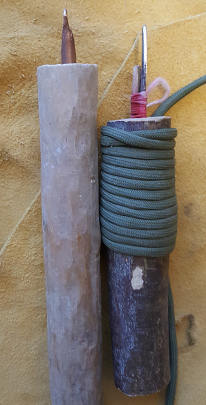 Notching pressure flakers: The flaker on the right is a horseshoe nail which is soft steel. It is very sharp. The flaker on the left is a copper pressure flaker that has been flattened. It is a similar shape to a flathead screw driver.
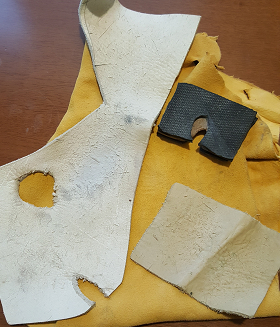 Leg and hand pads: Some form of protection is important when working with sharp material. I use a large piece of leather or buckskin to cover my leg and smaller piece in my hand.
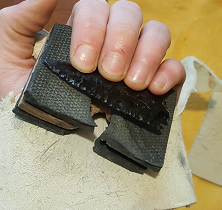 When doing pressure work, a hand pad (the black foam thing) and a piece of thick leather works well.
Parent Materials That Can Be Used for Flint Knapping Arrowheads
One of the best stones for flint knapping arrowheads is obsidian (also known as volcanic glass). Obsidian is an igneous rock. These stones are very brittle just like glass. It is produced when lava cools very quickly. Obsidian can produce one of the sharpest edges known to man. It has been stated that the cutting edge of obsidian can cut down to the molecule.
Other good stones are flint, chert, quartz, jasper, and some basalts. Since we live in the modern era, we also have access to manufactured glass which can be much easier to obtain than some of the stones mentioned above. I learned using glass bottle bottoms. They are easy to get and you won’t get as upset when you inevitably break your work.
Safety and Ethics for Flint Knapping Arrowheads
When you get started with flint knapping arrowheads, two things to keep in mind are safety and ethics.
First: Safety Glasses: Getting glass shards in your eye is not fun. Using safety glasses is a must. If you do get obsidian or something similar in your eye DO NOT RUB YOUR EYE. You can scratch your eye. The best way to deal with this is to use your tears. It is much gentler on your eye. After you are all teary eyed, you need to blink like crazy to remove the glass without any added injury. If this doesn’t work, you need to visit a hospital, doctor, or optometrist to help remove the stone flake from your eye.
Next: Gloves: This is more about preference. Some people like to feel everything and gloves will make it a little harder to feel the ridges, but they will prevent cuts. If you are flintknapping you will get cut. Gloves can mitigate this risk. I like to use one glove on my left hand. This is the hand holding the piece on which I am working. The type of gloves I like are the thin neoprene gloves. They give me good touch sensitivity and protection.
Then there is the glass/rock dust that is produced. When knapping you should knap in a well-ventilated area. If you must knap inside, fans and a respirator can help. Breathing in the dust can cause something called silicosis, which is a respiratory illness. It was pretty common among miners and people who ground gun flints. It takes a lot of time breathing in dust that is high in silica to come down with silicosis, but the damage is often permanent and can be severe.
The next and final thing to consider with flint knapping arrowheads is ethics and protecting the archeological record. This type of flint knapping has been done for thousands of years and we learn so much from historical sites of ancient peoples. And so, it is our responsibility to make sure that we are not creating false sites for future archeologists. The best way to do that is to make sure that all of your debitage is collected and disposed of properly. There are several ways to do this. First is to just toss the debitage in the trash. Second is to bury the debitage with something modern that will last a long time like a penny or a nickel.
And since obsidian and the other stones last for an extremely long time the pieces that you create should be signed with a diamond-tipped pen designed to score very hard material. You can scribe your initials and the year into a small part of the arrowhead.
In Summary
I hope this article sheds some light on the process of flint knapping arrowheads for you. Breaking rocks to make tools is something that all of our ancestors did. For me it is a connection to the past and a practical wilderness survival skill. It also is such a great feeling to make something useful and beautiful from what most would consider nothing. Now get out there and break some rocks!
By the way, if you enjoyed this article then you'll love our survival mini guide. You'll discover six key strategies to staying alive in the outdoors plus often-overlooked survival tips. We're currently giving away free copies here.
Additional Resources on Flint Knapping Arrowheads
Gain hands-on experience, instructor coaching, and additional know-how on flint knapping arrowheads by attending our Flintknapping Course.
Review the core concepts of making arrowheads with our basics of flint knapping article.
A great material to start working with is beer bottle bottoms. It allows you to practice and learn the concepts before spending money on expensive stones. Here is a great article on flint knapping arrowheads from beer bottles.

About the Author: Russell Field is a well-rounded naturalist with a passion for bushcraft and flintknapping. He was an instructor at Alderleaf. Learn more about Russell Field.
Return from Flint Knapping Arrowheads back to Survival Articles
Is The Essential Wilderness Survival Skills Course Right for You? Take the "Online Survival Training Readiness" Quiz
See for yourself if this eye-opening course is a good fit for you. It takes just a few minutes! Get your Survival Training Readiness Score Now!

Grow Your Outdoor Skills! Get monthly updates on new wilderness skills, upcoming courses, and special opportunities. Join the free Alderleaf eNews and as a welcome gift you'll get a copy of our Mini Survival Guide.

 The Six Keys to Survival: Get a free copy of our survival mini-guide and monthly tips!
Learn more