Flint Knapping Tools

By Dave Scott
The art of using flint knapping tools to create stone implements as our ancestors once did can be very rewarding. However, for beginning flintknappers it can be challenging to know what tools are necessary to get started.
Though one can certainly learn to flintknap successfully using stone, bone, antler, or wooden tools I recommend that beginning flintknappers start with modern copper tools. Once you are successful with modern flintknapping tools and understand the principals of how energy moves though stone you can transition to more traditional tools more easily.
There are two major ways to remove material from a stone in order to shape it, percussion, and pressure flaking. Each of these methods requires different tool types as described below. Most skilled knappers use percussion tools for removing larger flakes and for roughing out the piece, and utilize pressure flaking for final shaping and sharpening.

Modern Percussion Tools:
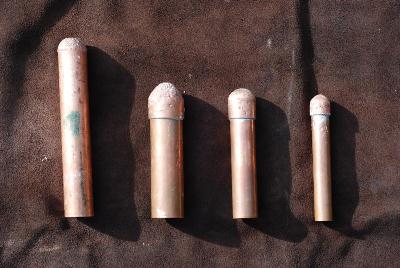
In the photograph above you can see the various sizes of billets that I have in my flint knapping tool kit. The three billets on the right are made of copper pipe. Each billet has a soldered copper cap attached to the end that has been pressed out to create a rounded end.
Unfortunately you cannot purchase rounded caps from the hardware store and must press your own if you wish to make these tools yourself. Each cap is filled with lead to increase weight and density (Disclaimer, breathing in the fumes of molten lead is very hazardous to your health).
The billet on the far left is made of a piece of solid copper rod. It is much denser than the hollow lead head billets on the right and I use it for spalling tool blanks from larger pieces of rock.
Billet dimensions from left to right, measurements are 1”X6”; 1 1/8” X 4 1/2”; 7/8” X 4 1/2”; 5/8” X 4 1/2”.

Modern pressure flaking tools:
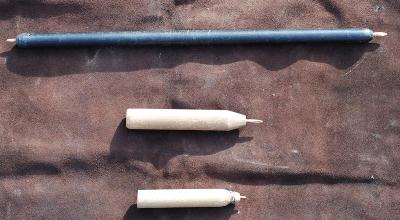
In the photograph above you can see various pressure flakers. From top to bottom: an Ishi stick, a hand flaker, and a sharpening and notching flaker. All of the pressure flakers are tipped with copper rod of varying sizes and are used for "pushing" flakes of stone off of a piece that is being worked.
Be More Prepared For Your Next Outdoor Adventure!

Don't leave without knowing these six essential survival skills. Our free survival mini guide reveals the strategies of:
- Shelter & fire to prevent the number one cause of death
- Obtaining clean water to avoid life-threatening dehydration
- Common wild survival foods and other critical skills!

The Ishi stick provides an advantage over the hand flaker because the length allows greater leverage when flaking. Generally I use the Ishi stick almost exclusively for most of my pressure flaking needs and prefer it to a hand flaker until I am ready to make my final pass on the piece.
I use the small notcher on the right for sharpening and notching pieces. Some flintknappers prefer to use a soft horseshoe nail instead of copper to tip the smaller notcher.
Flaker dimensions from top to bottom, measurement are diameter X length followed by copper rod insert diameter:
Ishi Stick (made of Derlin rod)– 5/8” X 19” double sided copper rod inserts measuring 3/16” and 1/4”
Hand Flaker – 1” X 6” copper rod diameter 3/16”
Sharpening and notching flaker- 7/8” X 5” copper rod diameter 1/8”

Additional Miscellaneous Flint Knapping Tools:
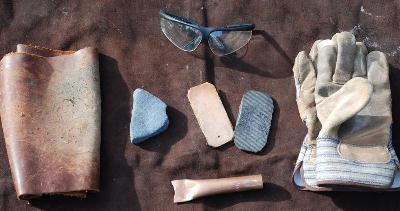
In the photograph above I have laid out some additional miscellaneous tools that you will need. A thick leather leg pad to protect your leg when billeting; an abrader, this one is made from a piece of broken grinding wheel but rough abrading stones can work just as well; a sheering tool (center bottom), made from a flattened piece of copper pipe; a hand pad to protect the hand when pressure flaking (center), you can use old conveyer belt or thick piece of leather, both are displayed above; safety glasses; and leather gloves.
Sheering tool dimensions - 7/8” x 6”
With a little practice I am sure you will find flintkapping to be a rewarding and pleasant pursuit! You can knap blades to use a wilderness survival knife and arrowheads for a survival bow and arrow set.
By the way, if you enjoyed this article then you'll love our survival mini guide. You'll discover six key strategies to staying alive in the outdoors plus often-overlooked survival tips. We're currently giving away free copies here.
For more information on flint knapping tools and techniques I recommend the following books:
Flintknapping: Making and Understanding Stone Tools - by John C. Whittaker
The Art of Flint Knapping – by D.C. Waldorf and Valerie Waldorf
Additional Resources:
Wilderness Survival Courses at Alderleaf
Learn how to use flintknapping techniques to make arrowheads, check out our article on Making Arrowheads.
Get in-depth training at our Stone Tools Class and Flintknapping Course.

About the Author: Dave Scott was an instructor at Alderleaf. He co-authored the field guide Bird Feathers - A Guide to North American Species. Learn more about Dave Scott.
Return from Flint Knapping Tools back to Wilderness Survival Articles
Is The Essential Wilderness Survival Skills Course Right for You? Take the "Online Survival Training Readiness" Quiz
See for yourself if this eye-opening course is a good fit for you. It takes just a few minutes! Get your Survival Training Readiness Score Now!

Grow Your Outdoor Skills! Get monthly updates on new wilderness skills, upcoming courses, and special opportunities. Join the free Alderleaf eNews and as a welcome gift you'll get a copy of our Mini Survival Guide.

 The Six Keys to Survival: Get a free copy of our survival mini-guide and monthly tips!
Learn more