Handdrill: Making Fire With Friction
The handdrill friction fire method is very old, and was used by many different cultures for millennia. It is a deceptively simple method for making fire, having only two main parts. These are the spindle and the fireboard. As with all friction fire methods, this one works by making a coal which can then be turned into a flame.
I say that this method is deceptively simple, because when one observes a skilled handdrill user utilizing this method and achieving success it can appear very easy. This, however, is not the case for many who try it the first time without proper instruction. Read on to learn how to improve your chances of success with this amazing fire-making method.
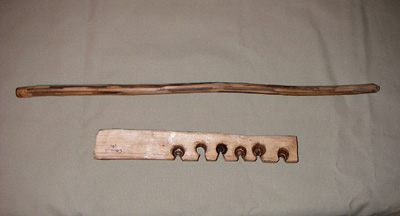
The Parts
First, you must understand the vital physical parts of this friction fire kit. Let’s talk about the two separate parts first.
Spindle: This is the long, straight piece that is spun in the hands to produce friction, dust and eventually a coal. When choosing a spindle from the wild, find a pithy plant such as mullein, elderberry, butterfly bush, salmonberry, bigleaf maple or similar plants that are about pinky finger thickness. Make sure they are very straight for at least an 18-inch section and smooth them with a knife so as not to tear up your hands.
Fireboard: This is the board with which the spindle mates. This is a thin board – about finger thickness – that is cut out of a dead and dry, semi-soft wood. Give the potential fire board material the thumb nail test for hardness - If you can’t mark it with your nail, then the wood is too dense. If you easily make a deep mark, the wood is too soft. If you make a small mark, then the wood should be just right.
Good woods to use for the fireboard in the Pacific Northwest are: cottonwood root, aspen, willow and western red cedar. Split the board out and carve it so that it is flat on both sides to reduce any tendency to wobble.
Putting It Together
In order to make these two parts work together, you must first prep the spot where they will meet. Lay the spindle on top of the fireboard, so that it is aligned with the outside edge of the board. Now, using the width of the spindle as a guide, make a mark with a knife. This will be a guide to help you carve out a shallow indentation for the spindle to sit in as you spin it the first time.
Next, you need to use the proper form to spin the spindle on the fireboard in order to burn in a new hole.
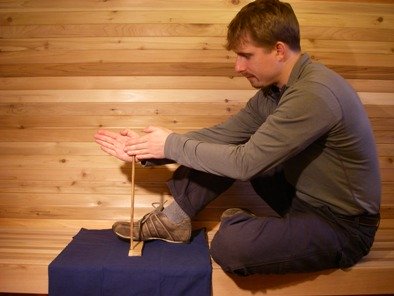
Handdrill Form
The proper form starts with you placing the larger end of the spindle on the indentation, so that the spindle is vertical (90 degrees to the ground and the fireboard). Now, place the spindle between your hands and spin it by moving your hands backwards and forwards , while putting pressure downwards and inwards into the spindle. As you apply pressure, this naturally results in your hands slipping down the length of the spindle. It is vital to maintain even pressure as you spin the spindle, so as to keep it moving in a vertical position. As you reach low on the spindle, quickly slide your hands to the top without allowing the spindle to pop out of the fireboard. Then apply pressure and rotation again. (See the photo above for proper alignment of spindle and fireboard).
At this stage, you want to do this until you see smoke and burn in the initial indentation to about the width of the spindle. It is important to do this step in this order, so that it can guide your next step in the process. The next step is carving the notch.
The Notch
The notch is very important, and needs to be in the correct location and the correct size in order to help you successfully make a coal. The notch is an 1/8 of a pie slice section of the board that is carved out. Line it up so that the narrow part of the notch (the point of the pie slice) reaches almost to the middle of the indentation you just burned in. Meanwhile, line up the widest portion of the notch facing outward. Since this is such a key part of handdrill success, take your time with it and make a good notch.
Making the Coal
Now, you are ready to try making a coal with your handdrill set. It is really handy to have a small, thin and flat item such as a piece of bark or a thick leaf under your notch so that it can catch your coal. Also, if you succeed at making a coal, it will need a nice fluffy, bird’s nest like tinder bundle. Making one that is large - for instance, as big as a softball – can really help you get that fire in the end.
Once you have these two items, you can really concentrate on making that coal happen. At this point, you must concentrate on both applying proper speed and downward pressure. Without enough downward pressure, but lots of speed you will create a glaze in your indentation on the board. This will reduce friction and minimize how much dust you can create. On the flipside, if you apply too much downward pressure you will drill through the fireboard and have to start on a new spot on the fireboard.
Be More Prepared For Your Next Outdoor Adventure!
Don't leave without knowing these six essential survival skills. Our free survival mini guide reveals the strategies of:
- Shelter & fire to prevent the number one cause of death
- Obtaining clean water to avoid life-threatening dehydration
- Common wild survival foods and other critical skills!

Use a pace and pressure so that you are producing lots of dust within the notch and watch for smoke. Once the notch is filled up with dust, increase your speed and pressure for the final push to produce a coal. It requires a temperature of between 800 and 816 degrees to ignite the dust into a coal.
While spinning the spindle, try to use as much of the surface area of your hand as you can (lengthwise) so as to maximize the time of each rotation. Be patient with this technique, and practice a little bit everyday. Don’t over do it, as practicing handdrill too much will have a tendency to cause blisters and force you to take longer breaks. If you do get blisters, take a break and let them heal before trying again. Eventually you will develop calluses on your hands that will help you practice for longer periods of time.
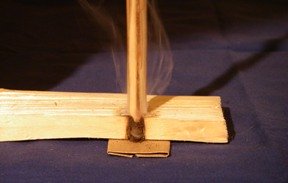
The Floating Technique
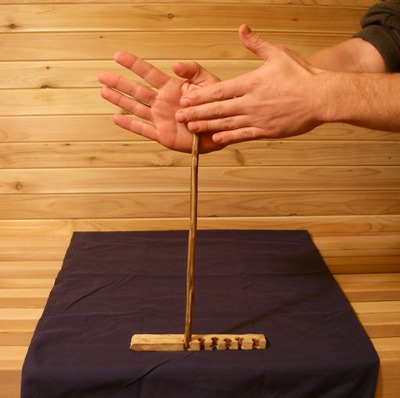
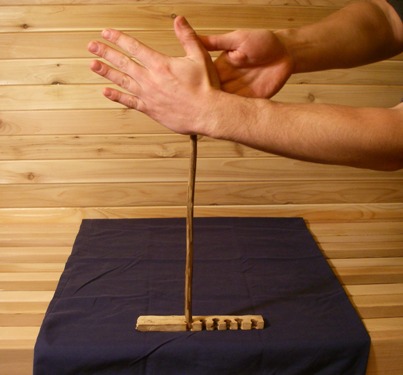
With handdrill practice, there is a natural tendency to have the hands slide down the spindle as you spin it and apply downward pressure. With practice, you can keep your hands at the top of the spindle while both rotating it and pushing downward. This technique is known as “floating” and requires practice to master. Floating requires that your hands are moved in a half circle or arc, with the lowest point of the arc falling at the spindle. Learning this technique can greatly improve the consistency with which you make coals. (See the two photos below for reference).
How to Use Your Body
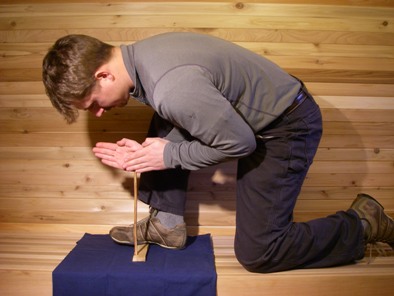
In order to apply the maximum amount of pressure with least amount of exertion, it helps to hold your body in a manner that will allow you to naturally push down. One of the best ways to position yourself while doing the handdrill technique is to use the following position: place one foot on the board, rest on the knee of your other leg and position your upper body so that your chest is over your hands. This should allow you to apply maximum pressure with less effort. (See the photo below)
Remember to apply a relaxed and yet firm grip on the spindle. Unnecessary tension in the hands or upper body will create fatigue very quickly. You can apply a little bit of spit or pitch to your hands to give you a little more grip on the smooth spindle.
With practice, this technique is an effective friction fire making method in many environments. Remember that if you intend to use this technique to make fires - especially in potential survival situations – make sure you can successfully make coals with consistency under different conditions. With practice, you can become masterful at the handdrill technique.
Good luck and enjoy your practicing!
By the way, if you enjoyed this article then you'll love our survival mini guide. You'll discover six key strategies to staying alive in the outdoors plus often-overlooked survival tips. We're currently giving away free copies here.
Further Resources:
Hand Drill Fire Starting - Practical Survivor
Recommended Reading:
The Outdoor Survival Handbook by Ray Mears
Wilderness Survival Handbook by Michael Pewtherer
Related Courses:
Wilderness Survival Weekend Course

About the Author: Filip Tkaczyk is a periodic guest teacher at Alderleaf. He also wrote the field guide Tracks & Sign of Reptiles & Amphibians. Learn more about Filip Tkaczyk.
Return from Handdrill back to Wilderness Survival Articles
Is The Essential Wilderness Survival Skills Course Right for You? Take the "Online Survival Training Readiness" Quiz
See for yourself if this eye-opening course is a good fit for you. It takes just a few minutes! Get your Survival Training Readiness Score Now!

Grow Your Outdoor Skills! Get monthly updates on new wilderness skills, upcoming courses, and special opportunities. Join the free Alderleaf eNews and as a welcome gift you'll get a copy of our Mini Survival Guide.

 The Six Keys to Survival: Get a free copy of our survival mini-guide and monthly tips!
Learn more