Creating a Worm Composting System
Turning Food Scraps into Rich Soil!
A worm composting system is an easy, inexpensive and compact way to turn your food scraps into rich, plant-nourishing compost and organic fertilizer! Its an excellent addition to any sustainable home, garden, or permaculture farm. Worms are an excellent choice for small scale composting, such as in your home garden or kitchen. This system of composting is also called the "vermicompost system" or the "worm bin."
Why Do it?
Worms change food scraps into a rich usable material that helps fertilize our gardens and indoor house plants. This type of organic compost/fertilizer is superior to other forms of compost. The worms' mucous plays a special role in slowing the release of nutrients from the compost. Their mucous is deposited with their droppings (called "castings") and helps bind nutrients into the compost so that they are not easily washed away by watering or rain.
Choosing a worm composting system
There are many possibilities in starting a worm composting system. You can purchase a pre-made kit or make your own. Worm bins use smaller varieties of worms that feed close to the surface for decomposition (instead of typical earth worms). The types of small worms used in worm composting systems include red wigglers and manure worms.
One system is in essence a single chambered bin. These can be as large as a shipping crate or as small as a shoebox. A challenge with this worm composting system is separating the worms from the finished vermicompost. Also, the single chambered bin can often become too wet, especially here in the Pacific Northwest. This is because as the worms process food scraps, excess fluid is created. This fluid, known as "worm tea" is an amazing, concentrated natural fertilizer.
Another system is a multi-tiered worm bin. The tiers often consist of several totes or trays nested on top of each other with small holes drilled into the bottoms (except for the bottom tote/tray which is used as a worm tea catch basin). We like using the multi-tiered because the worms sort themselves away from the completed vermicompost and worm tea, which makes for easy collection.
Naturally, decomposing worms like to feed close to the surface, so in the multi-tiered system that is where we place the food scraps for them to eat. Start by placing food scraps in the first tier. As you feed, your first tier fills. You can then add new food scraps above into the second tier. When the worms finish processing food scraps in the first tier they naturally move upwards through the small holes into the second tier and so on. By the time you get to the top-most tier the first tier will be finished compost with very little worms to be sorted out. It leaves you with a nice supply of worm tea in the basin to use as fertilizer.
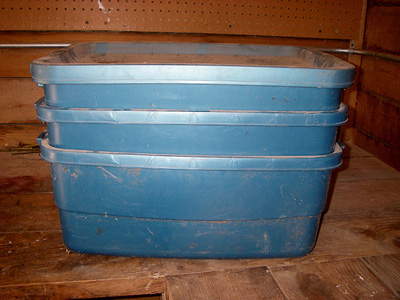
A simple and inexpensive bin system can be made using plastic totes stacked into each other. Since these are already made to fit one into another, they make it easy to make a multi-tiered worm composting system. Here is a photo of one of the worm bins we made and use at Alderleaf Farm:

Making a multi-tiered worm bin
For starters, you need some kind of container. Rubbermaid totes are easy to start with and inexpensive. They leave a good amount of space for food and for worms to move around when stacked into each other. Acquire four totes, measuring 24" long by 16" wide and 9" deep. Make sure they are the same size, so they fit into each other. Leave one intact, and set it aside. Take the other three, and drill many tiny holes across the entire bottom of them with a bit size of about 3/32". These are just the right size for drainage and to allow the worms to migrate upwards through the trays.
Take one of the lids, and make tons of tiny holes (a drill bit of 5/64" is great). This is key, to allow the worms to get fresh air.
Be More Prepared For Your Next Outdoor Adventure!

Don't leave without knowing these six essential survival skills. Our free survival mini guide reveals the strategies of:
- Shelter & fire to prevent the number one cause of death
- Obtaining clean water to avoid life-threatening dehydration
- Common wild survival foods and other critical skills!

As a starting substrate you will need damp bedding, which can be peat, coconut fiber, crumpled leaf litter, or thinly shredded newspaper or brown paper bags. Place this in the first tier and add your worms. Give the worms a few days to get comfortable in their new home before you put in your food scraps or other organic wastes. Then cover the food with a damp piece of newspaper or brown paper bag as they like to eat under protective cover. As the worm composting system becomes more established, you no longer need to dampen the paper cover.
Set the totes into each other with the intact one on the bottom as the basin to capture the worm tea.
Make sure you follow the list of do's and don'ts below!
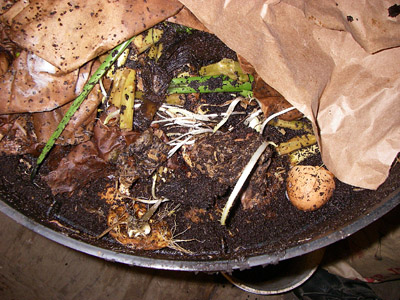
 Food scraps transforming into vermicompost!
Do's and Don'ts
The following are two lists of things that you should practice to maximize the health and happiness of your worms. Here are some of the key things to do:
- Use red wigglers or manure worms (Eisenia fetida or Lumbricus rubellus)
- The ideal balance of worms to food scraps per week ratio is 1 lb of worms to .5 lbs of food scraps (2:1 ratio). For an established bin, that is about the food scraps from 2-3 people per week.
- Do pay attention to the smell of the worm bin. If it becomes smelly it is likely receiving too much material for the worms to break down quickly. This means you need to cut back on the amount of food for a short time.
- When in doubt, add more bedding
- Keep your system at a temperature of between 59 and 77 degrees for the most ideal conditions for your worm composting system
- Do dilute your "worm tea" before using on plants, as it is a potent fertilizer
- Relax, have fun and let the worms eat your garbage. Then come and collect the reward.
Here are some things to not do:
- Don't put oils, dairy, or meats into your worm bin, as they don't break down and attract pests
- Don't put very many citrus rinds or large amounts of coffee grounds in the worm composting system as it can make the environment too acidic for the worms. If you're a heavy coffee drinker, just place the grounds at the base of your acid-loving plants like roses, or blueberry bushes.
- Don't put your worm bin in the sun, as it will get too hot! Also, protect them from prolonged freezing temperatures.
- Don't completely seal off your worm bin from the air, as they need to breathe
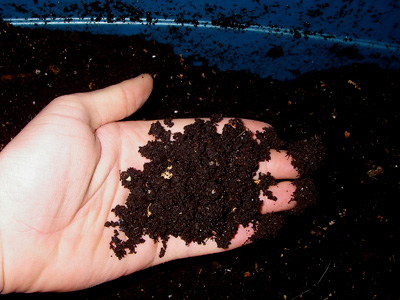
 Vermicompost ready for the garden!
Closing thoughts
Using a worm compost system is fun, easy and can be educational. It will provide you with an excellent source of nutrients for your plants while turning a waste stream into a valuable resource! A worm composting system can be an excellent element to almost any permaculture design. Remember, you can always encourage your friends and neighbors to create their own worm bins, and can even offer some of your worms to get them started.
By the way, a big part of why we love homesteading & permaculture skills so much is because they are a natural extension of learning about wilderness survival (both fields are all about self-sufficiency and working with nature to satisfy needs). An understanding of survival not only helps you become a better permaculturist, it empowers you with life-saving outdoor skills to keep you safe when out in nature. Right now you can get a free copy of our mini survival guide here, where you'll discover six key strategies for outdoor emergencies, plus often-overlooked survival tips.
Resources:
One of the best resources for creating and maintaining your worm composting system is the book "Worms Eat My Garbage" by Mary Appelhof. This book gives a detailed description on all aspects of the process.
Check out this Mother Earth News Article by Mary Appelhof, A Step by Step Guide to Vermicomposting!
Learn more about sustainable living skills like worm composting, check out our Permaculture Courses.

About the Author: Filip Tkaczyk is a periodic guest teacher at Alderleaf. He also wrote the field guide Tracks & Sign of Reptiles & Amphibians. Learn more about Filip Tkaczyk.
Return from Worm Composting System back to Permaculture Articles
Is The Essential Wilderness Survival Skills Course Right for You? Take the "Online Survival Training Readiness" Quiz
See for yourself if this eye-opening course is a good fit for you. It takes just a few minutes! Get your Survival Training Readiness Score Now!

Grow Your Outdoor Skills! Get monthly updates on new wilderness skills, upcoming courses, and special opportunities. Join the free Alderleaf eNews and as a welcome gift you'll get a copy of our Mini Survival Guide.

 The Six Keys to Survival: Get a free copy of our survival mini-guide and monthly tips!
Learn more